카테고리

분류 전체보기 (68)
JAVA-기본 (7)
JAVA-AWT (24)
JAVA-클래스의 중요메소드 (23)
JAVA-람다식 (0)
Android Studio (7)
Python (1)
OpenCV (1)
AWS (0)
webrtc (0)
javascript (4)
처리방침 (1)
rss 아이콘 이미지

layout- LinearLayout(안드로이드)

Android Studio/기본1 2023. 1. 8. 17:12 Posted by IT-개발자
반응형

레이아웃 종류는 다음과 같습니다.

ConstraintLayout, LinearLayout(horizontal), LinearLayout(vertical), FrameLayout, TableLayout, TableRow, Space


그중에서도 LinearLayout을 살펴보도록 하겠습니다.

LinearLayout은 여러 View(Button, imageView 등) 컴포넌트들을 수직적(Vertical), 수평적(Horizontal)으로 컴포넌트를 레이아웃 위에 정렬하여 배치할 수 있습니다.  그래서 수직, 수평적으로 사용하기 때문에 LinearLayout은 직관적이라는 장점이 있습니다.


그러면 LinearLayout에 대해 실습을 해보도록 하겠습니다.

1. 새로운 Project를 만들겠습니다.
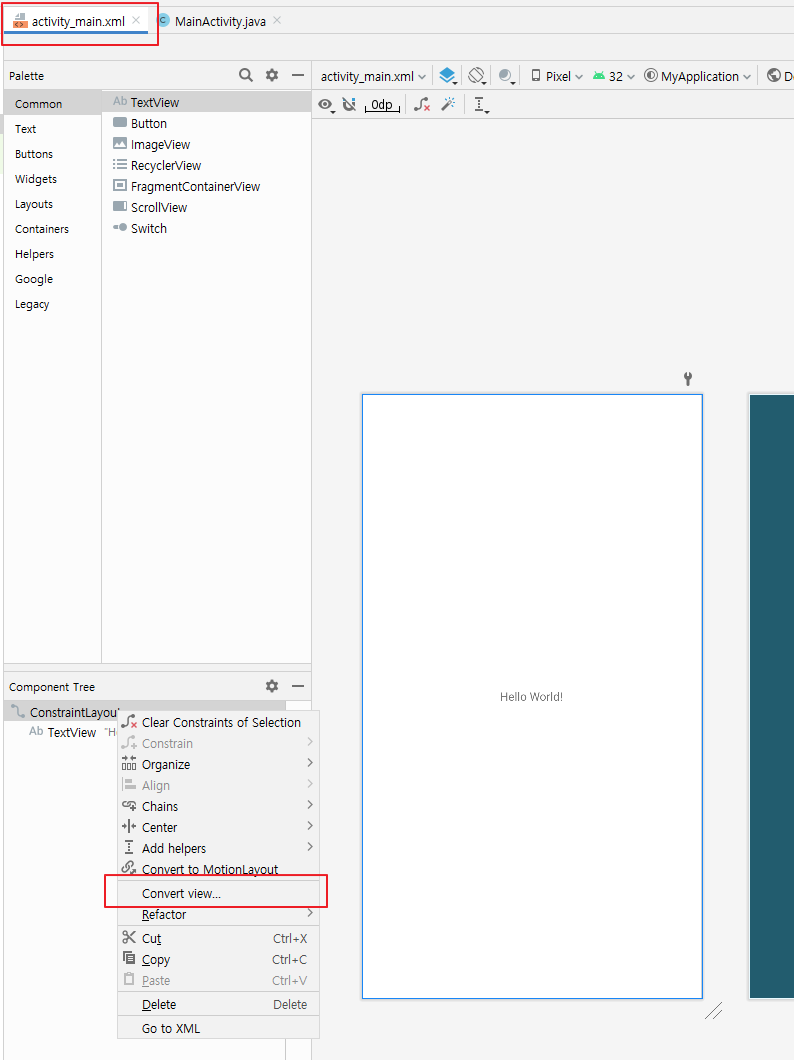
2. 처음 생성한 프로젝트의 activity_main.xml 화면에서 Component Tree 는 앞의 시간에 확인하였듯이 ConstraintLaytou으로 지정되어 있으나 오른쪽 마우스를 클릭해서 Convert View를 통해 View를 LinearLayout으로 변경하도록 하겠습니다.
3. LinearLayout으로 변경하기 위해 해당 레이아웃을 클릭한 후 Apply를 클릭하도록 하겠습니다.
4. 레이아웃을 바꾸면 기본적으로 Horizontal 인 수평정렬이 기본으로 세팅되어 있습니다.
5. hello world인 TextView 컴포넌트의 오른쪽 속성인 layout_width를 변경하여 현재 warp_content인 내용물에 맞춰진 크기를 match_parent를 변경하여 부모창인 LinearLayout에 맞추도록 하겠습니다.
6. 위와 같이 hello World가 부모창인 LinearLayout에 맞춰진것을 확인할 수 있습니다.
7. TextView 컴포넌트를 드래그해서 추가하도록 하겠습니다.
8. TextView 두개의 컴포넌트가 Horizontal 인 수평정렬이 된것을 확인할 수 있습니다. 혹시, TextView가 겹치는 현상이 이으면 layout_weight 가중치를 모두 1로 설정하면 됩니다.
9. Horizontal 인 수평정렬에 대한 가중치 값


그러면 이어서 레이아웃을 Vertical인 수직으로 바꿔서 실습해도록 하겠습니다.
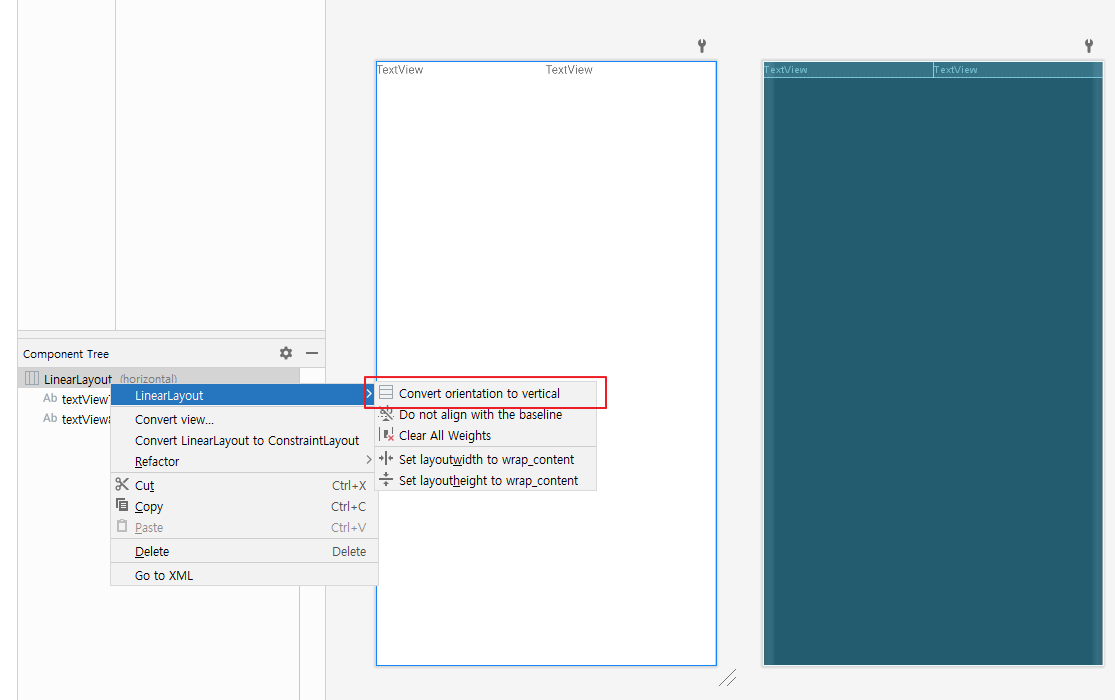
1. LinearLayout에서 오른쪽 마우스를 클릭해서 Conver orientation to vertical(수직)로 바꾸면 되고 만약 vertical인 경우에는 horizontal로 바꾸면 되겠습니다.
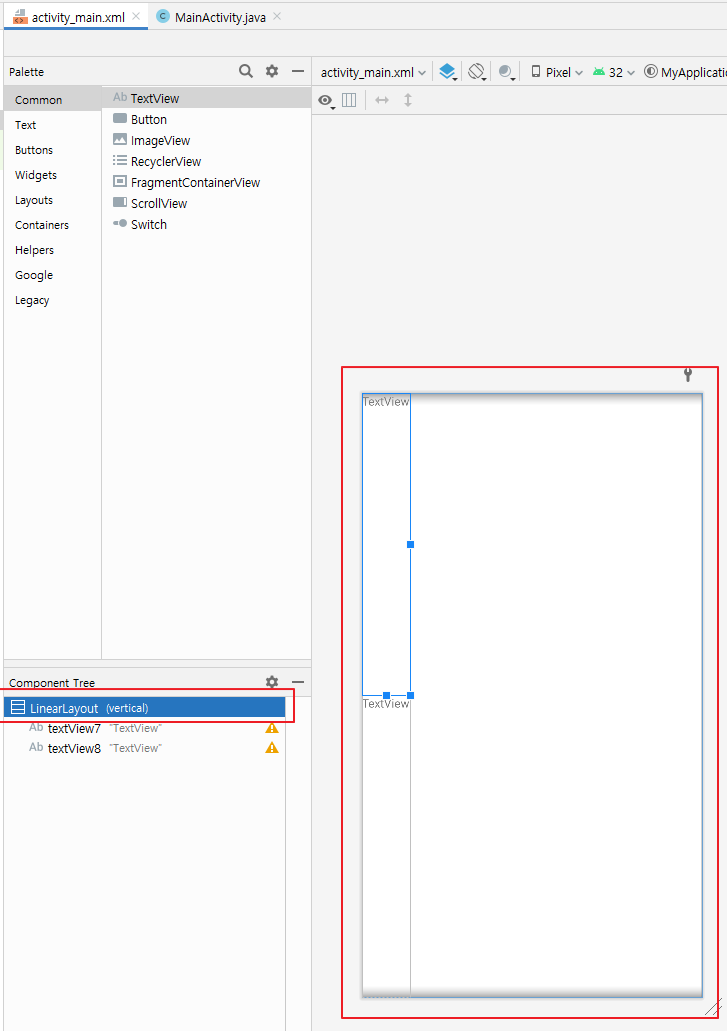
2. 레이아웃이 vertical 의 LinearLayout으로 바뀐것을 확인할 수 있으며 자동으로 textView들이 가중치인 weight 1에 의해 세팅된것을 확인할 수 있습니다.
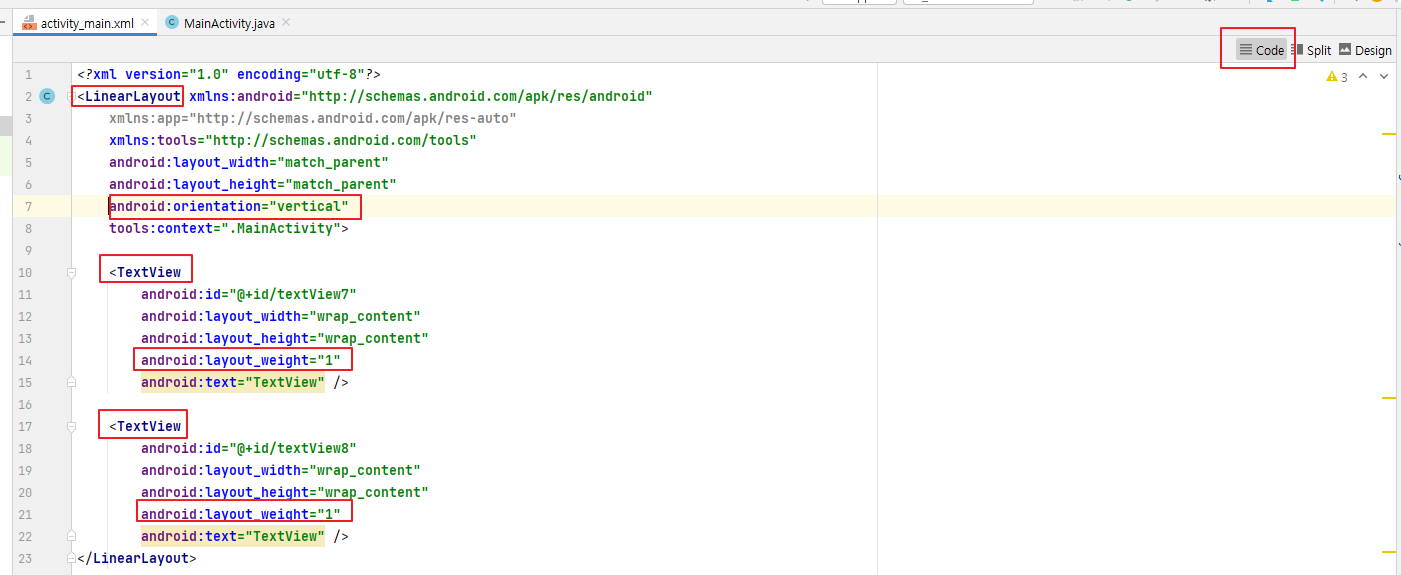
최종적으로 Code형태로 이를 확인하면 LinearLayout의 vertical 형태인 orientation 속성을 확인할 수 있습니다. 그리고 TextView 2개의 가중치 또한 확인 할 수 있습니다. 위의 Code의 모든 xml 값을 복사해서 새로운 Project가 생성되었을때 복사하여 붙여넣으면 그 디자인을 바로 쓸수가 있습니다.

<?xml version="1.0" encoding="utf-8"?>
<LinearLayout xmlns:android="http://schemas.android.com/apk/res/android"
    xmlns:app="http://schemas.android.com/apk/res-auto"
    xmlns:tools="http://schemas.android.com/tools"
    android:layout_width="match_parent"
    android:layout_height="match_parent"
    android:orientation="vertical"
    tools:context=".MainActivity">

    <TextView
        android:id="@+id/textView7"
        android:layout_width="wrap_content"
        android:layout_height="wrap_content"
        android:layout_weight="1"
        android:text="TextView" />

    <TextView
        android:id="@+id/textView8"
        android:layout_width="wrap_content"
        android:layout_height="wrap_content"
        android:layout_weight="1"
        android:text="TextView" />
</LinearLayout>

자료가 마음에 드셨다면 자주 찾아주세요^^ 글 올리는데 힘이됩니다.

반응형

'Android Studio > 기본1' 카테고리의 다른 글

layout-ConstraintLayout(안드로이드)  (0) 2023.01.07
01. 기본 레이아웃 xml 설명  (0) 2022.12.21